Etcher is a newly launched utility software that allows you to create bootable USB drives easily. Etcher was developed by Balena and the source code of Etcher is available to download freely from GitHub. In this quick guide, I am going to show you how you can create a bootable USB stick for Ubuntu with Etcher. In order to get started, you need to have a couple of things with you. First, you need the Etcher software itself, the ISO image file of your desired OS and a USB stick to contain the installation files.
Preparing The USB Stick With Etcher
Now you can go ahead and download the Etcher software from their official website. Etcher setup is a very lightweight one and won't take much of your space. On the website, there are few versions of Etcher available for each platform; so please select the one that matches your system. After downloading the setup, install the Etcher software and launch it once the shortcuts are created.
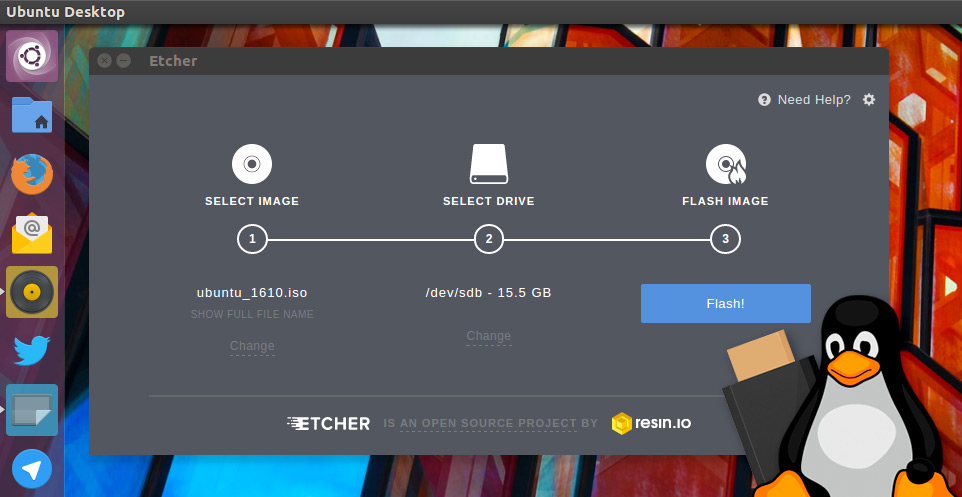
- After launched, you will be presented with a very easy to use GUI. The best thing about Etcher is that it's GUI. When compared to other utilities like Rufus, this has a very beginner-friendly GUI.
- Now, click on the "Browse" button and locate your ISO file. If you loaded the ISO file correctly, Etcher will indicate the ISO file's name.
- Now plug in your USB stick to the computer. Before doing so, please make sure that other USB sticks are plugged out.
- In some cases, to write to the USB stick, you may have to disable the write protection of the USB stick with the switch on the stick (if your stick has that kind of a switch). The process I am going to explain in this guide will erase all data that is already on your USB stick! Therefore, please make sure that you are using the correct device name. If you use the wrong name, you could lose all the data on your hard drive! Also, back up all of your important data.
- In addition to the installation files, you can also leave data on the USB stick without losing bootable feature. But we do not recommend this since it slows down the creation process. After that, confirm your selection by clicking on the "Next" button.
- Now the Etcher will check if everything is correct and then it will start the bootable USB creation process. It will take about 5 minutes to complete this process and make sure that you don't accidentally plug out the USB stick while it is in progress. After this is done, you will be notified with a message.
- To boot the PC from the USB stick that you've created using Etcher, insert the boot USB stick into your computer and restart the PC.
- The boot menu can normally be opened by pressing the F12, F10 or Esc key. You can find out which key is in your case in the manual of your motherboard or searching the model number on the internet.
- You will be taken to a boot configuration menu in which you select the USB stick using the arrow keys on your keyboard and confirm your choice with the Enter key. Once you restart the system again, you will get the installation Window.